Sunday, 23 January 2011

Assingnment (UNIT 107) Presentation Of Images

I have decided to present my images using a slide show.  This isn't how I ideally would like to present them but due to time constraints put on me by my job its the most doable in the time I have.  I will put my images onto a C.D. and take them to class with me, from there I can open up the images and view in a slide show using Apple's built in software.

I could have used framed prints to display my images but after a few test prints I decided it was going to take too much time and money to get the prints looking how I had them on screen.  Also I would have had to have cropped the images differently to fit the various standard sized frames.  In the time I had available it was not a viable option.

So I'm off on a residential training course next week and I'll probably be about half an hour late for the lesson, my apologies in advance.  I will bring my images on a C.D. to display.

And so that's that, finished the course and hopefully I've done enough to pass.  Thanks to Marie, Dave, my Dad and my Brother for their patience and time.  Standing in that silly hat holding a case in the freezing cold can't be much fun.

I think I have acquired all of the basic skills required to develop as a photographer and I will continue to learn more and improve in my own time.

Assignment (UNIT 108) Manipulation of Images. Final Images & Evaluation.

For this unit I saw the images I wanted in my head.  I then had the task of finding/thinking of suitable locations to capture each image I was thinking of.  As a result of this each image was the result of a completely different location, four shoots spread over about two weeks.

I used my Canon 1000d slr with a sigma 18-50mm f2.8 standard lens.  I was also forced to use my Canon speedlite flash gun on one of my shots due to insufficient light.  The exposures would be long so to prevent camera shake I took my tripod to all of the shoots.

I decided to use an exorcist looking character for all of my shots, I wanted to create the sense that he moves around at night undetected and in a very mysterious way, this is how they would all link in with the horror theme.  There were no legal or ethical considerations to take into account because it was all within the law and my own work.  No companies or individuals would be cast in a negative way due to my photographs.  The only thing we did consider was annoying other people so we worked quickly and as unintrusive as possible.

For health and safety we decided to wrap up warm because it was very cold.  We wore sensible footwear and took a torch with us so we could see what we were doing.

The software I used to manipulate these images was Adobe Photoshop CS4 Extended.
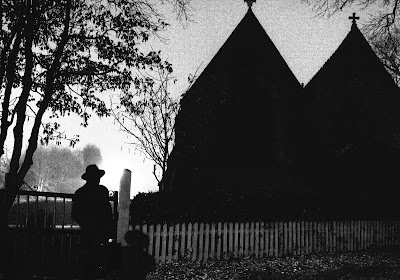

f/2.8   1sec   ISO-100

For the image above I used the widest available aperture and a low ISO to let in the most light without compromising on image quality.  I achieved this by using a long exposure of 1 second and placing my camera on a tripod with a time delay.  This prevented any blur from camera shake.  I felt that it was important when shooting to look at the original photograph and see what it would look like after modification and not in its original state, this is how I prevented myself from discarding potentially good images. 

Below all of the pictures are the original images.
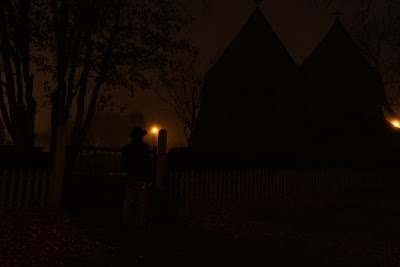

Church Original

To achieve the finished product I converted the image to black and white using the desaturate tool.  His jeans needed to look like dark trousers and I wanted the brief case to be black so I created a much darker exposure on a separate layer mask.  I then painted in the darker exposure on the case and trousers.  To create the overall film noir look I used Filter>Artistic>Film Grain and used the sliders Grain, Intensity and Highlight Area until I had the desired effect.

The next image was taken on a canal bridge about a mile from where I live, I thought the rails of the bridge would make the image more interesting than a normal style canal bridge.
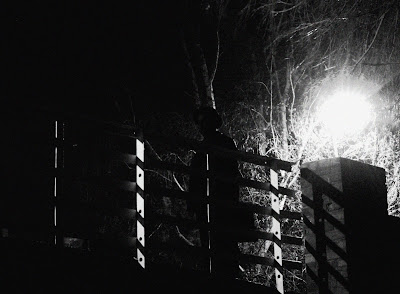

f/2.8   2sec   ISO-200


This image was created in exactly the same way as the first one using desaturate, the film grain filter and sliders.
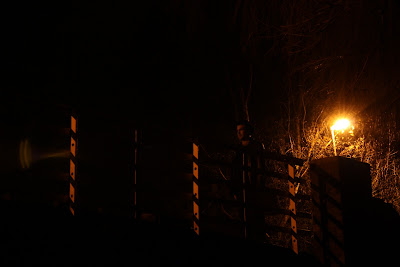

Bridge Original

The original image initially failed the quality checks because you can see an image of the lens on the left hand side.  I tried my best to get a shot without this in but because of the direct intense light it was not possible so I decided that I would crop it out.

The following image turned out okay in the end but my original concept was to have the an intense light behind the subject.  This was not possible so I had to resort to my trusty flash gun and adjust the exposure in photoshop later.
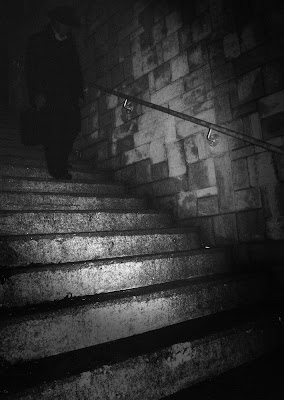

f/16   1/125sec   ISO-200

Again as with the other photographs I used the same tools to convert the image.  What's different here is that the picture is illuminated from flash from the front, the opposite of what I wanted.  I overcame this by focusing the flash on the steps and not on the subject, this only threw out enough lights to get the steps and the subject remained quite dark as if emerging from the shadows.  It was still way too bright though so I layered in a separate exposure and painted it over the subject.  I also wanted different intensity's of highlight area on the steps than the wall so I created two separate layers with different highlight area and intensity settings, using layer masks I painted the different settings over the wall and the steps.  I also hated the white shirt so using clone stamp I cloned out the shirt making it look like the jacket was done up.  The image was still too light so I painted a vignette style darkness around parts of the image.
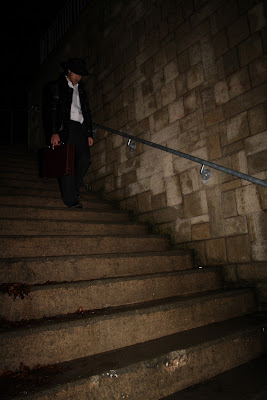

Steps Original

As you can see the original image is very different and would pretty much be useless without the power of photoshop but already knew when I was taking the images what I could do to get them how I wanted.  If when I got back and uploaded them I couldn't get the effects I was hoping for then I would have gone out and re shot it.

The final image is my favourite because of the overall finish and the concept of the picture.  Waiting for a train illuminated by a street light.  It was an added bonus and really contributes to the overall success of the picture when a train started coming along the line.
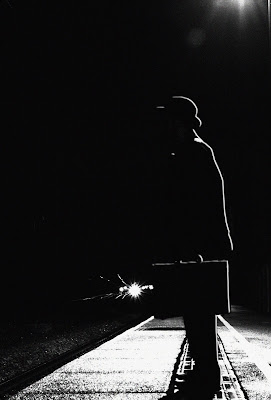

f/8   2sec   ISO-200

I used the the desaturate and film grain filter here too but the figure of the man was too bright again.  I did my usual trick of painting on a separate layer but then he got lost into the dark background.  I overcame this problem by using Layer>Blending Options>Bevel and Emboss.  This gave the character a nice light outline as if coming from the streetlight, I tidied up any suspicious edges with the clone stamp.  Selective sharpening using Unsharp Mask was done on the trains light to make it cut through the darkness more.
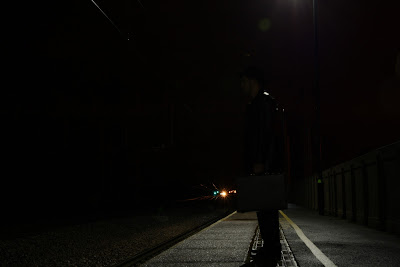

Train Station Original

I cropped the original into portrait format to get rid of any areas that were not needed around the edges.  I also think it suits the image better.

I am very happy with the images I got and my only regret is that I didn't have time to shoot the other shots I have in my head.  I can cut and paste into photoshop also but I didn't feel it was necessary in achieving my desired look.  I feel as though I have made a giant improvement in my use of Photoshop and am already using it competently.  I know that I haven't even scratched the surface of what it is capable of doing yet and I look forward to improving my skills with this invaluable tool.

Assignment (UNIT 108) Developing Ideas.

For my Manipulation of Images unit I decided to go with my horror theme from the initial ideas.  I really wanted to capture shadowy and spooky looking images using available light at night time.  So after a bit of brain storming and looking at a few pictures on the internet the promo photograph for The Exorcist came into my head.  I'm not really a fan of the film but the image of the man outside of the house I felt was very much the path I wanted to go down.


I really like the way everything is silhouetted and this is exactly the style of photograph I wanted to create but in my own way.  I think even though in the film the exorcist is the good guy there is something quite sinister looking about the character in the hat with the case.

Also after researching many photographers I stumbled across the work of Brassai.  By this point I'd already completed my first two shoots but found that my work was very similar to his.


Brassai, Foggy Paris.

Brassai.

His use of dramatic lighting and film noir style was exactly the route my own work was taking so I was a little disappointed to find that someone as famous as him had already done it.  Damn you Brassai.  Anyway seeing his work only inspired me more to continue with the film noir style.  I would use slow shutter speeds to let enough available light to reach the sensor and the manipulate the images in photoshop to get the desired look.

Saturday, 22 January 2011

Assignment (UNIT 105) Final Images and Evaluation

The photographs I have chosen for my final images are from three different shoots.  Before each shoot I planned what sort of shots I'd like to achieve and briefed the subject about the kind of thing I was going for.  Also before each shoot I planned what equipment I would use and took health and safety into consideration.

The equipment I used on all my shoots was a Canon 1000d digital slr body, sigma 18-50mm f2.8 standard lens, Canon speedlite external flash gun, Canon camera battery, SD memory card, a Geottos tripod with ball head and a hoya ultra-violet filter.  The filter was used just to protect the lens.

All photographs were closely scrutinised afterwards and checked for sharpness, focus and if the composition was right.  Also they needed to fit in with my style and the colours needed to be similar.

For the first shoot I had to take into consideration that we were using a replica gun.  Although absolutely harmless it could cause distress and panic if a member of the public saw us.  The shoot was down a local under pass late at night so we had to take into account health and safety.  The area is renowned for gangs of youths up to mischief so we worked quietly and quickly.  It was also very dark so we took a torch so we could see where we were going and our mobile phones in case of emergency.

The second and third shoots were similar because they involved having beer bottles and cans in public places.  The illegal aspect of this was removed by emptying the contents before we hit the streets.

My original theme idea was gangs but it became clear to me that I would have to tweak the idea slightly to make it easier to shoot.  I didn't have loads of people on hand to shoot gang scenes so I shot individuals doing gang related things.  Although my images are portraiture, I was trying to get a documentary kind of feel to the shots.

Here are the final images.


f/10   1/160sec  ISO-200

The image above is the opener of the series because the "bright future" wording sets the scene for where this kind of lifestyle leads.  As we were on the third shoot I noticed this graffiti under an under pass and thought it would send out a strong message.  It was quite dark but I didn't want to open up the aperture for risk of parts of the shot being out of focus, so I kept the aperture reasonably closed and used an external flash gun.  This also enabled me to use a higher shutter speed, as the shot was hand held it prevented any camera shake.


f/8   1/125sec   ISO-100

In this image I wanted to get the eyes in sharp focus but have the gun slightly blurred as if it was coming towards you.  I achieved the selective focus by controlling the depth of field with an aperture of f/8 and locking focus on the eyes then re framing the shot.  Even though this was taken in very dim light I got away with using a low ISO by using my flash gun, this enabled the best image quality and no grain.


f/4.5   1/250   ISO-200

I always think when I see this shot that it looks quite real, my brother was really great at this stuff and almost completely immersed himself in character.  I think his accurate portrayal and the overall look I achieved adds to the documentary feel I was hoping for.  Inspired by the film This Is England I dressed him in Ben Sherman and dark blue jeans.  It was a big help that he was already a skin head.  I took a few shots experimenting with different apertures until I managed to get the one I wanted. The open aperture slightly blurs the hand and on reviewing the images I felt it looked best and had a rawer feel.


f/6.3   1/160sec   ISO-200


This is probably my favourite shot from the series because I think it looks authentic.  Although staged I think the way he is standing against the post looks quite natural.  I purposely chose this location because of the council houses in the background played a significant role in setting the scene and making it look like a genuine documentary shot.  For the composition I used the rule of thirds, framing him to the right of the frame.  I was very inspired by Tobias Zielony's work in his series Curfew and decided to try and get a similar style.  I achieved this by not upping the contrast and draining the colours slightly. I think this makes the mood of the picture a bit more glum and resembles Zielony's work more.


f/4.5   1/250   ISO-200

My brother by this time was so deeply engrossed in character he decided to free style, he was moving, gesturing and getting quite aggressive.  I used a fast shutter speed to freeze the action and just fired off loads of shots while he was in full flow.  I decided on this one because he looks quite aggressive and that he might do some damage with the bottle.  I think it reflects the theme well and because it's improvised and not posed for it adds to the documentary style.


f/8   1.3sec   ISO-200

This shot was taken inside an under pass and uses the darkness of the tunnel and the back light from the street lamps to cast the subject into shadow.  I was only using ambient light so it was important to have a long exposure to let more light onto the sensor.  I had to use a tripod and a time delay to prevent camera shake.  The only light source was a street light so I had to change my cameras white balance to tungsten.  Some people would probably crop out the surrounding darkness but I have chosen to leave it in so it looks like the end of a tunnel.  The composition I feel is very strong with the subject placed in the centre and in sharp focus, the way the slabs fit together draws the viewers eye down the tunnel.


f/6.3   1/160   ISO-200

I have been undecided as to include this image or not because I don't feel that technically it is very strong.  However the idea I had for this shot would be to close the series off with a behind bars photograph to suggest that he would end up in prison.  I wanted him to look washed out so I didn't increase any contrast.  To make it clear that this was just some railings I decided to leave the top of the bars in the crop.  I asked my friend to roll his sleeves up to reveal his tattoos and make the image more interesting.  It's not my favourite and I'm not totally happy with how it turned out but I like the concept of ending with this shot so I have included it.

On the whole I am very happy with what I have achieved.  I think all of the images relate well to the theme and my inspirations are evident in my photographs.  I think it's clear that I have come a long way since my first blog and I now feel confident and competent in using a camera in manual.

Wednesday, 19 January 2011

(UNIT 107) Presentation of Images. Initial Ideas.

There are many different ways I could use to present my images.  Some of these ways are:

Prints and Frames

Getting prints done of your images has never been easier.  You can get them done by uploading to the internet or by going directly into a printing shop.  I did a test print at a high street printers last week and it came out slightly different to how the picture looks on screen so this could be a problem when displaying my final images.

The prints that you get done would look best in frames.  Different styles of frames and different colours can be used depending on the type of picture.  For example, A fun style picture may have a colourful wacky frame.  I feel that because my photographs are of a serious subject matter that a plain gallery style frame would suit them better.

Photo Books

You can order hard back or soft covered photo books off various websites.  They cost between around £10-£30 depending on how many images you have or the style of book you go for.  This would be a great way to display my images but because I have only got six I haven't got the minimum amount of images needed to produce a book.  Also the book would look quite bear and you have to wait a while to receive the book in the post.

Slide Shows

Using the software on the computer I could display my images on screen.  This way is not ideal because I don't think it does your work justice, however it is most likely to be the way I choose due to time constraints and difficulty with prints.

Sunday, 16 January 2011

Assignment (UNIT 107) Presentation

I must present at least 6 images that are related to a theme.
I in order to complete this assignment i must:

Task 1a  (Present Images)
  1. Produce images relevant to a theme.
  2. Use of techniques, materials and media.
  3. Accuracy and detail of finish.
  4. Overall visual impact.

Task 1b  (Produce a Written Account)
  1. Outline the methods used to present the final images.
  2. Outline how I could have presented them using a different presentation method.

Assignment (UNIT 108): Digital Image Manipulation

I must modify at least 4 images that relate to a theme.  All images must be substantially modified.

Task 1a  (Image Manipulation)

  1. Produce 4 modified and stored images.
  2. Images must relate to a theme.

Task 1b  (Supporting Evidence)

A written account showing:
  1. The image modification software used.
  2. The image quality checks carried out.
  3. How the images relate to the theme.
  4. Legal and ethical considerations.